How Aluminum Car Bodies Affect Paint Adhesion After Panel Replacement
Aluminum car bodies demand a different approach to panel replacement and refinishing. Their lightweight construction, oxide layer, repair contamination risks, and thermal sensitivity can all influence paint adhesion if preparation is incomplete.
For technicians and operators, the central conclusion is straightforward: a replacement aluminum panel can accept a durable finish, but only when the repair process controls surface chemistry, contamination, coating compatibility, and curing temperature.
Most paint failures on aluminum do not begin with the topcoat. They usually originate during panel handling, sanding, cleaning, seam sealing, primer application, or an improper bake cycle.
Understanding how aluminum car bodies behave after panel replacement helps repair teams avoid peeling, blistering, corrosion, edge lifting, and costly refinishing work that may appear weeks after delivery.
This guide explains the practical causes of adhesion problems, the repair decisions that matter most, and the checks operators should complete before releasing an aluminum-bodied vehicle.
Why Aluminum Panels Require Different Paint Preparation
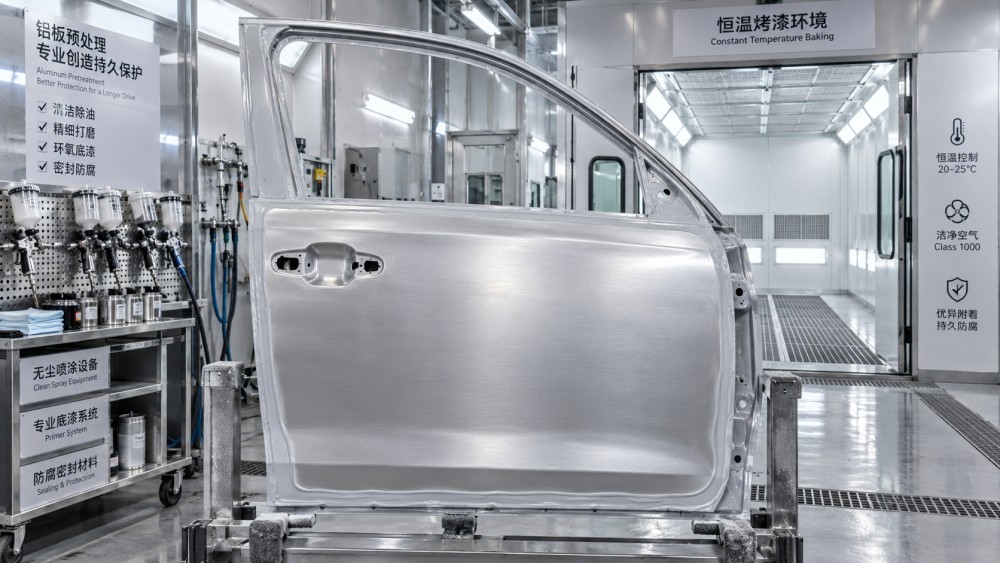
Aluminum is increasingly common in hoods, doors, fenders, liftgates, roofs, structural members, and complete vehicle body architectures because it reduces mass without sacrificing required strength.
However, aluminum car bodies do not react like conventional steel during collision repair. Their surface condition changes quickly, and their corrosion behavior depends heavily on isolation and coating integrity.
Fresh aluminum immediately forms a thin oxide layer when exposed to air. This natural film protects the metal in some conditions, yet it can interfere with coating adhesion when preparation is delayed or inconsistent.
The oxide layer is not always visible, so a panel may appear clean while still presenting a chemically unsuitable surface for primer or conversion coating.
Replacement panels can also arrive with transport coatings, oils, fingerprints, labels, adhesives, or manufacturing residues. These materials may be compatible with shipping, but they are not automatically suitable for refinishing.
Operators should never assume that a new aluminum panel is ready for paint because it is visually smooth. Confirm the manufacturer’s coating condition and the approved preparation procedure first.
A correct process begins by identifying whether the panel is bare aluminum, e-coated, pre-primed, coated with a temporary protective film, or supplied with a specific OEM finish requirement.
This information affects sanding, cleaning, primer selection, seam sealer placement, bake temperature, and whether an adhesion-promoting pretreatment is required before the normal refinishing stack.
The Main Reasons Paint Fails After Aluminum Panel Replacement
Poor adhesion is rarely caused by one obvious error. It is usually the result of several small process failures that weaken the bond between aluminum, pretreatment, primer, basecoat, and clearcoat.
Surface contamination is one of the most common causes. Hand oils, silicone, lubricant, polish residue, grinding dust, adhesive residue, and airborne shop contaminants can disrupt coating wetting.
Aluminum dust deserves particular attention. Sanding or grinding creates fine particles that can migrate across the repair area, settle into seams, and contaminate adjacent coatings if housekeeping is weak.
Inadequate cleaning is often confused with insufficient sanding. Sanding creates a mechanical profile, but it does not remove every chemical contaminant trapped within surface texture or panel edges.
Improper use of cleaning products can create another problem. A dirty wipe, evaporated solvent residue, or wiping in the wrong direction may spread contamination rather than remove it.
Technicians should use approved cleaners, clean lint-free wipes, and a two-cloth method where applicable. One cloth lifts contamination, while the second removes remaining cleaner before evaporation.
Another frequent failure is applying an unsuitable primer directly to aluminum. Not every general-purpose primer provides the required chemical adhesion, corrosion resistance, or compatibility with the specified topcoat system.
Using products outside their published film-build range can also reduce performance. Excessively thick primer may trap solvents, while insufficient coverage may leave vulnerable areas near edges, folds, and fastener openings.
Timing matters as well. If bare aluminum remains exposed too long after abrasion, oxidation and handling contamination can return before the next coating stage begins.
How Galvanic Corrosion Can Undermine the Refinish
Paint adhesion on aluminum car bodies is closely connected to corrosion control. Aluminum does not rust like steel, but it can corrode when moisture and dissimilar metals create an electrochemical path.
This is called galvanic corrosion. It becomes a concern when aluminum contacts unprotected steel, certain fasteners, metallic repair debris, or incompatible materials in a damp environment.
After panel replacement, corrosion may begin at joints, hems, rivet locations, bonded seams, weld zones, damaged e-coat areas, or places where sealant coverage is incomplete.
As corrosion products develop beneath a coating system, they can push against primer and topcoat layers. The visible result may be blistering, edge lifting, staining, or localized loss of adhesion.
Technicians should follow OEM instructions for isolation materials, rivets, adhesives, sealers, corrosion protection, and fastener types. These requirements are structural and refinishing instructions, not optional cosmetic details.
Steel tools can also transfer particles onto aluminum surfaces. Dedicated aluminum repair tools and separated work areas reduce the risk of cross-contamination from steel dust and grinding residue.
Particular attention is needed around repaired flanges and interior cavities. A good exterior paint appearance cannot compensate for unsealed joints where moisture can enter after the vehicle returns to service.
Before refinishing, inspect seams and attachment points for continuous protection. The objective is to restore the original barrier system, including seam sealer, cavity wax, underbody coating, and edge coverage.
Surface Preparation Steps That Support Reliable Adhesion
A repeatable preparation sequence is more valuable than a rushed repair shortcut. Operators should use the vehicle manufacturer’s repair information and the coating supplier’s technical data sheets together.
First, verify the panel material and coating state. Some aluminum panels require limited abrasion, while others require complete removal of damaged coatings in defined repair zones.
Next, remove shipping films, labels, residues, and loose contamination using approved methods. Do not use aggressive products that may leave a film or damage factory-applied protective coatings.
Clean the panel before sanding, then clean it again after sanding. This prevents contaminants from being driven into the surface profile during abrasion and removes sanding debris afterward.
Select abrasives that produce the coating system’s recommended scratch pattern. Excessively coarse scratches may remain visible or create weak points, while overly fine preparation can reduce mechanical anchoring.
Avoid polishing the aluminum surface. A bright, smooth appearance may look clean, but it may provide inadequate texture for the primer system and can make contamination harder to detect.
After abrasion, apply the approved pretreatment or direct-to-metal primer within the specified time window. Follow flash times carefully, especially where temperature and humidity affect solvent evaporation.
Masking should protect adjacent surfaces without trapping dust near repair edges. Remove or lift masking at the appropriate stage to prevent hard paint lines and edge damage during final assembly.
Every exposed cut edge, drilled opening, flange, hem, and repaired seam requires deliberate coverage. These locations are the most likely to develop corrosion-driven coating failure later.
Choosing Primers, Sealers, and Paint Systems for Aluminum
The coating system must be treated as a complete stack rather than a collection of separate products. Adhesion depends on compatibility between pretreatment, primer, sealer, basecoat, clearcoat, and curing process.
Many refinishing systems specify an epoxy primer, self-etching primer, conversion coating, or approved direct-to-metal product for bare aluminum. The correct choice depends on the supplier’s documented process.
Do not combine products simply because they are available in the paint room. A primer from one system may not be approved under another brand’s surfacer, sealer, or waterborne basecoat.
Epoxy primers are often valued for corrosion resistance and substrate adhesion, but they still require correct mixing, induction time, film thickness, flash time, and topcoating interval.
Etching products can be useful in specified processes, yet they are not universal solutions. Some coating systems restrict their use beneath certain primers, fillers, or repair materials.
Seam sealers and panel bonding adhesives must also be compatible with the refinishing schedule. Some materials require full cure before paint, while others allow wet-on-wet application only within defined windows.
Operators should record batch numbers, mix ratios, reducers, hardeners, and booth conditions for significant repairs. This documentation helps diagnose a later concern and demonstrates process discipline.
When uncertainty exists, consult the current technical data sheet rather than relying on a similar previous repair. Aluminum repair requirements can differ by vehicle model, model year, and substrate location.
Heat Management Matters More Than Many Operators Expect
Aluminum conducts heat efficiently and can respond differently than steel during drying, baking, induction heating, and localized repair procedures. Thermal control affects both coatings and the panel itself.
Excessive heat can alter adhesive performance, damage seam sealers, distort thin panels, degrade nearby components, or exceed limits established by the vehicle manufacturer for structural repairs.
Low bake temperatures can create a different problem. If a coating does not reach its required metal temperature for sufficient time, solvent retention and incomplete crosslinking may reduce long-term durability.
The air temperature displayed by a spray booth is not necessarily the actual panel temperature. Use suitable temperature verification methods when process specifications require metal-temperature confirmation.
Panel shape, thickness, reinforcement structure, and adjacent materials can all influence heating behavior. A large aluminum hood may not heat uniformly, particularly around hems and inner-frame areas.
Follow product-specific flash and bake instructions rather than extending heat exposure to accelerate throughput. Faster cycle times are not valuable when they create adhesion or corrosion warranty risk.
Before applying heat near bonded panels, airbags, sensors, wiring, trim, or structural adhesives, review OEM limits. Refinishing cannot be separated from the vehicle’s safety and assembly systems.
Inspection Checks Before the Vehicle Leaves the Repair Facility
A final visual inspection is necessary, but appearance alone does not confirm coating durability. A disciplined release process checks whether the repair sequence protected the aluminum substrate at every stage.
Inspect repaired edges under strong lighting. Look for thin coverage, dry spray, exposed metal, pinholes, sanding scratches, tape lines, solvent pop, overspray, and uneven clearcoat texture.
Check panel gaps, seams, fasteners, and attachment locations after reassembly. Incorrect alignment can damage fresh paint, compromise sealers, or expose a previously protected flange to moisture.
Confirm that cavity protection, underbody coatings, wheelhouse liners, splash shields, and drainage paths have been restored. These parts help prevent water and road debris from reaching vulnerable areas.
Where permitted by the coating system, perform documented quality checks for film thickness and cure condition. Use non-destructive methods and follow product instructions to avoid damaging a completed finish.
Ask whether every bare-metal area received the specified treatment before it was covered. This single question often identifies missed edges, rushed repairs, or undocumented deviations from procedure.
Operators should also confirm that any required calibration, corrosion warranty procedure, or OEM repair documentation has been completed. Panel replacement affects more than the painted outer surface.
Practical Warning Signs After Refinishing an Aluminum Panel
Early warning signs should be investigated promptly. Small defects near a repair edge may indicate a broader preparation issue rather than an isolated cosmetic flaw.
Watch for blistering, lifting around chips, staining at seams, bubbling near fasteners, paint separation at hems, or corrosion-like deposits emerging from behind a trim piece.
Adhesion concerns may also appear after temperature changes, repeated washing, winter road exposure, or humidity cycles. These conditions can reveal defects that were not visible at delivery.
When a failure occurs, avoid simply sanding and repainting the visible defect. Determine whether contamination, incompatible products, insufficient pretreatment, trapped moisture, or galvanic corrosion caused the problem.
A root-cause review should include repair records, product data sheets, panel condition, environmental conditions, curing information, and inspection of adjacent seams or interior surfaces.
This approach prevents repeated rework. A finish can look excellent immediately after polishing while still lacking the substrate protection needed for years of normal vehicle exposure.
Conclusion: Aluminum Paint Adhesion Depends on Process Control
Aluminum car bodies can be repaired and refinished to a durable, factory-quality standard, but success depends on controlling preparation rather than treating aluminum like ordinary steel.
The most important priorities are clean handling, correct abrasion, timely pretreatment, compatible coating materials, protected joints, controlled curing, and thorough inspection of edges and hidden areas.
For technicians and operators, the practical rule is simple: every step that protects the aluminum substrate before topcoat application protects the finish from future failure.
By following OEM repair information and coating supplier procedures, repair facilities can reduce peeling, blistering, corrosion, rework, and customer concerns after aluminum panel replacement.